
At this time Windows 8 is full of features that are confusing
even for the most experienced PC user though. But not all of these
features are bad. Worse, the OS is designed primarily for touch control,
and as a result, the use of the mouse and keyboard feels like a touch
screen. We have compiled a favorite list of Windows 8 shortcuts, tricks,
and workarounds . Now let's start our journey from
easy-to-use eyesight though often hard to remember, ie Windows 8 hotkey .
Using Hotkeys on Windows 8
In this key combination, hold down the Windows key (usually
located between Alt and Ctrl) and other buttons, as described in this list.
- Press
the Windows key to enter the Start Screen screen.
- Press
the Windows key + M key to minimize any page on the desktop.
- Press
the Windows key + E key to open Explorer for quick access to the folder.
- On
the Home screen, press the Windows key + D key to open the desktop.
- Press
the Windows key + Tab key to open the list of currently running programs.
- Press
the Windows key + Print Screen button to take a screenshot and save it in
the Screenshots folder in your photo folder.
- To
take a screenshot on a Windows 8 tablet, simultaneously press the Windows
key and the volume-down button on the tablet's chassis.
- Press
the Windows key + Q key to open the global search menu. Type what you
are looking for and where you want to see.
- Press
the Windows key + W key to open the search in the system settings quickly
and change the system settings.
- Press
the Windows key + F key to open the file and search folder.
- Press
the Windows key + Pause button to open the system properties page to
display a brief description of your specifications.
- Press
the Windows key + "," (that's a comma!) Make all windows
transparent, so you can peek at the desktop as long as you hold the
Windows key.
- Press
the Windows key + "." Locked window to right or left side
(toggling every time you press ".").
- Press
the Windows key + R menampilakn RUN command, useful for launching
applications and other routines quickly with the command prompt.
- Pressing
the Windows key + X key will open the Access Menu quickly, expose system
functions such as Command Prompt, Disk Management, File Explorer, Run, and
more. Alternatively, you can right-click in the bottom-right corner
of the screen to eject the Quick Access Menu.
- Pressing
the Windows key + I key opens the settings menu, giving you quick access
to Control Panel, Personalization, and Power buttons, and other features.
- Press
the Windows key + O key orientation on the device with accelerometer.
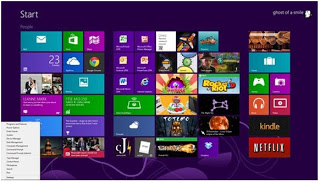
Features
Zoom Out and Zoom In

The large, beautiful Screen Start Screen represents all your
apps. With apps in small groups that are easy to see, but what if you have
hundreds of apps installed? Most will be hidden from view of your Start
Screen screen, unless you want to do a lot of scrolling. So you can see
hidden apps. If you are using a touch screen, start pressing the screen
with two fingers to get a view with the Zoom feature so your app will look
great. And this feature is also available for mouse and keyboard users:
Just hold down the Ctrl key, and use the mouse wheel to zoom in and out.
Categorize Your Apps

First, drag all the apps you want to group into one group to the
right side of the Start screen in an empty area. Once you're done with the
app's clustering, use the semantic zoom (described above) to get a full view of
the app on the screen. Now right-click the group (or just drag it down on
it), and select the "Group name" option to the left of the bar that
appears below. Type in the name of your group, and enjoy the screen you
have designed you want.
Close the app
Closing an application sounds pretty simple,
but you'll soon see that the close button is hard to find in Windows 8. That's
because Microsoft encourages us to run the app by taking the minimal resources,
but still accessible at all times.
However, if you still insist, you can close an app by dragging
it with your mouse or finger from the top of the screen all the way
down. As you drag, the app will miminize to the thumbnail, and when you
reach the bottom, it will disappear from view. Alternatively, you can
still close the app via Alt + F4 and through Task Manager.
Use Contextual Search

The
feature of the search function lies in the Charm Bar ,
allowing you to search directories and not just on your Windows 8 machine, but
also on larger Windows ecosystems. Simply select the bucket data you want
to filter like: all your installed applications, your system settings, your
files, your email and messages, or even external services like Windows Store or
Bing Maps. Type in a keyword, and press Enter. The Search function
will then provide you with the perfect search results from your database.
Privacy Settings

Many of the users set the privacy application
by default, such as: images, locations, and names contained in your operating
system. And many of the operating system users do not feel comfortable and
secure their data. So to adjust your privacy settings, simply press the
Windows key + l key, and enter the PC Setttings settings, select privacy
option , and personalize your personal data settings there.
Adjust SmartScreen Settings

The SmartScreen feature warns you before running an unrecognized
app or file from the internet. While it helps to warn the source file,
constant warnings can also be a bit annoying. To make the settings by
default, you need permission from the administrator account, but this can
easily be adjusted with only a warning or no indication at all. Using
the magic search function described above, type "security"on
the Start screen and find "Check security status" on
the Settings tab. Thus, you can customize various security settings,
including SmartScreen Windows.
Bring
up Quick Access Menu

Right-click on the bottom left of the screen-whether you are on
the Windows Start screen or on the desktop-will bring up the Quick Access Menu,
which allows direct connection to many key system management tasks, including
Disk Management, Task Manager ,Device Manager ,
and Control Panel .
Use
Windows 8 apps and your Desktop simultaneously
Because Windows 8 experience is shared between
new Windows 8 Store apps and desktop old-school
desktop applications , operating systems are vulnerable to strange
cases. Case in point: When running the multimonitor setup, the Windows 8
app will consume your main screen, then leave your secondary screen to run the
desktop. This setting would seem to allow full
screen with multitaskingbetween the two types of modern
applications on the left side, the desktop app on the right side, but this is
not the case. Of course, once you start using the desktop on your secondary
screen, the new style of Windows 8 app disappears, and your home screen starts
running the desktop.
But on your main screen, by using the new Windows 8 split-screen
"snapping" function to run both the desktop and Windows 8
store apps at the same time. The desktop can take a left piece of screen,
while Windows 8 app consumes most of the screen. Now use thesecond screen for
a complete desktop view. In this setting, you can fully multitask
between new-style applications and desktop applications,
and both windows will be large enough to be useful to use
Task
Manager for Startup items

You no longer have to run the msconfig program to change the startup items . The startup item now appears in the tab in Task Manager.Just press Ctrl + Alt + Del and select Task Manager. Click "More details" at the bottom and find the Startup tab at the top.

You no longer have to run the msconfig program to change the startup items . The startup item now appears in the tab in Task Manager.Just press Ctrl + Alt + Del and select Task Manager. Click "More details" at the bottom and find the Startup tab at the top.
Share
and Share alike

Windows 8 is Microsoft's first social-media-aware PC operating
system . By using the Share button located in the Charm
bar , you can select a number of elements from the Windows 8 Store app
such as: the location of your Application Map, news from the Finance
application, or even contacts from your friends app, and then distribute the
items to your friends. Your friends through other Windows 8 programs.
Perhaps the easiest, you can quickly share photos via email or
Twitter, or to your own SkyDrive or Windows Phone. By using the contextual
Share Button, and the more you use it, the more you will find apps that share
with each other, and which ones are not. (Hint: No desktop app offers you
a chance to share through the Charms menu ).
Create
Password with images

Using a password with pictures is a fun way of keeping your
device, so you do not have to remember your passowrd. To enable it, press
the Windows key + I key to get to Charm settings . Click "Change
PC settings" at the bottom right, and go to the Users tab. Below
the"Sign-in options" option will be the "Create
a picture password" button . This will give you the
option to select any image, and then specify any three moves in the
image. Your movement can be circled, swipes, and clicks.
For example, to set the image password for the image above, you
can click on the highest palm tree, draw a circle around the island, and then
slide down from the outer lens at the top right. But be careful: because
the direction of every thing gesture effect! After confirming several
times, your image password will be set.
Boot
to the desktop without using the app

One of the biggest
complaints about Windows 8 is that booting directly to the Start Screen is an
inconvenience to desktop users. The Start8 utility helps you
avoid this issue (among other interesting features), but you can actually boot
directly to the desktop without having to install anything.
Go to the Start Screen screen and type "schedule" to
find the schedule task in the settings page . Click
on the left Library Task Scheduler, then choose Create
Task . Give your task something like "Boot to desktop" . Now
select the Triggers tab , select New, and use
the drop-down box to select start "At log
on" task . Click OK and go to the Actions tab ,
select New, and enter "explorer" for Program
or Script value .
Log
In without username and password
To speed up the log-in process, you may want to disable username
and password log-in on your screen. You can do this by opening the Run
window (press the Windows key + R key) and typing "netplwiz" to
access the User Accounts dialog box . Uncheck the box
near the top that says "Users must enter a user name and
password to use this computer". Click OK, and
enter your username and password for the last time to confirm your choice, and
you are ready for easy access to your system.
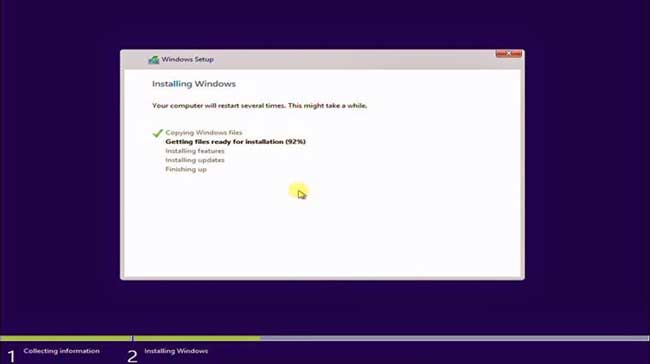
Refresh
Your PC

If your operating system feels a bit sluggish, it may be time to
refresh. In the past we had to find a copy of Windows 7, to back up all
the data, and do a fresh install to enjoy back-to-factory-fresh . But
now Windows 8 allows you to perform new installations from within Windows
without losing any data.
In order to refresh, go to Settings and click
the Change PC Settings tab near the bottom. Select
the General tab and find "Refresh your
PC without affecting your files" near the center (you can also
select "Remove everything and reinstall Windows" to
get the correct windows settings). Select "Get started" and
press "Refresh" . After a few minutes the PC
will restart, and you will have a copy of Windows 8.
Start
in Safe Mode
Safe Mode is a great way to get into your system, when something
that will not allow you to start windows normally. Problems become easy
when drivers are corrupted and files that are not loaded prevent the system
from functioning normally. This is used as easily as pressing F8 when the
system starts up, but doing it with Windows 8 will take you to Auto Repair
Mode. Trick to get back to Safe Mode as before, ie Hold down the Shift key
and press F8 at boot up.
This will take you to Recovery Mode , then
Select advanced options , then troubleshoot ,
then choose advanced options again. SelectWindows
Startup Settings and finally the Restart button . This
will reboot your computer and give you the option to boot into Safe Mode.
If you need to enter Safe Mode from within Windows, open the
dialog box (Windows key key + R) and type "msconfig" (without
the quotation marks). Select the Boot tab and check
the Safe boot box box. The system will continue to boot into
Safe Mode until you get back and uncheck the box.
Turning the Application On and Off

You can customize which apps are running and which are not by
right-clicking on the tile app. A settings bar at the bottom will appear
with the option to turn Live Tile on or off. Just select
the preferred option, and you are ready. However, that not all apps
have real-time data-streaming options .
Search
for Windows game Folder
Currently the game folder contained in Windows 7 is not present
in Windows 8. Do not be afraid, if you install the current generation PC games
will instantly save the game regularly, and the folder will automatically be created. For
a quick way to find the game folder, right-click on the game icon on the Start
screen and select "Open file location" at the
bottom.
Enable
Family Safety

Shut
down with one click

Create a shortcut on your desktop (right click, go to New, then Shortcut). Enter "shutdown
/ s / t 0" (without quotation marks, and, yes, it is zero instead
of "O") as the item location, and press Next. Now
name the shortcut (prefereably "Shutdown" ) and
press Finish.
Right-click
on the shortcut, and navigate to Properties. Select
the Change Icon on the Shortcut tab, then OK to
leave the warning box.Select the icon of your choice from the list. In the
picture above, you will see we choose the Power button. Right-click the shortcut
again, and select Pin to Start. You can place an icon on your
Start screen wherever you want. By clicking on the button it will
immediately turn off your computer.


