Tampilkan postingan dengan label Aurelia Tutorial. Tampilkan semua postingan

Kamis, 10 Agustus 2017

Aurelia - Best Practices

Aurelia is new framework so the best practices are yet to be established. In this chapter we give you some useful guidelines you can follow.

Starting New Project

Aurelia offers aurelia-skeletons. There are couple of skeletons to choose from. The team behind Aurelia is actively supporting the skeletons, and they are always up to date with the newest version of the framework.

Aurelia Skeletons

  • skeleton-es2016-webpack allows you to write ES2016 code and use NPM for package management and webpack for bundling.
  • skeleton-es2016 allows you to write ES2016 code and use JSPM for package management and SystemJS for loading and bundling.
  • skeleton-typescript-webpack allows you to write TypeScript code and use NPM for package management and webpack for bundling.
  • skeleton-typescript allows you to write TypeScript code and use JSPM for package management and SystemJS for loading and bundling.
  • skeleton-typescript-asp.net5 allows you to write TypeScript code and use JSPM for package management and SystemJS for loading and bundling. The ASP.NET backend is also integrated.
  • skeleton-es2016-asp.net5 allows you to write ES2016 code and use JSPM for package management and SystemJS for loading and bundling. The ASP.NET backend is integrated.
You can clone all skeletons from GitHub. The installation instructions can be found inside README.md files for each skeleton.
C:\Users\username\Desktop>git clone https://github.com/aurelia/skeleton-navigation.git

Folder Structure

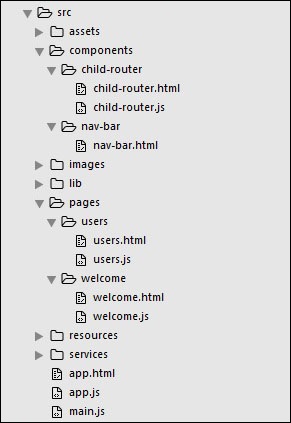
You are free to use any folder structure you want. If you are not sure where to start, you can use our folder structure as image below shows. The image represents files and folder in src directory.
Aurelia Best Practices

Web Standards

Aurelia is framework oriented to web standards. This was one of the main goals of the team behind it. They will make sure that the framework always follows modern web. This is extremely good for the developers since we can rely on usability of the framework in the future. It also helps us to always be up to date with the browsers and the web.

EcmaScript 6

This is good practice not just for Aurelia but for any other JavaScript framework. ES6 offers new functionalities that can help us in development process. You can also use TypeScript if you like strongly typed languages.

Aurelia - Community

Community is one of the most important factors to consider when choosing framework. Aurelia offers fantastic support for its customers. In this chapter we will show you where you can get help when you are stuck.

Aurelia - Official Documentation

you can find Aurelia docs on this link − http://aurelia.io/docs.html

Aurelia Gitter - Channel

If you need fast answer, you can always submit a question to aurelia gitter channel. This channel can be found on following link −https://gitter.im/Aurelia/Discuss

Aurelia - Github

You can also submit an issue to official Aurelia github repository https://github.com/aurelia

Aurelia - Blog

If you want to keep track of any updates and changes of Aurelia, you can follow Durandal's official blog http://blog.durandal.io/

Aurelia - Rob Eisenberg Blog

You can also follow official blog of Rob Eisenberg, creator of Aurelia framework http://eisenbergeffect.bluespire.com/

Aurelia - Enterprise Support

Aurelia offers enterprise support for teams and individuals. If you are interested, send an email to the following address −
support@durandal.io

Aurelia - Hire Dev Team

You can hire Aurelia Expert Developers by sending email to this address −
consulting@durandal.io

Aurelia - Training

If you want Aurelia official training for your team, you can email this asdress −
training@durandal.io

Aurelia - Debugging

In this chapter we will show you how to add Aurelia context debugger as a chrome extension.

NOTE

Before we are able to add the extension, we need to have aurelia-tools files. If you don't have it, you can check our Aurelia - Tools chapter.

Step 1 - Open Chrome Extensions

The easiest way to open chrome extensions is to run the following code in browsers URL bar.
chrome://extensions

Step 2 - Add Extension

Since this extension isn't yet available from Chrome store, we need to check developer-mode checkbox and click Load Unpacked Extensions. This will open small window where we can choose extension to add.
We will choose Desktop/aurelia-projects/tools/context-debugger folder and open it.
Now we can see that extension is loaded in browser.
Aurelia Debugging Context Debugger
We can also check the developers console. When we click elements tab, we will see aurelia-properties in bottom right corner.
Aurelia Debugging Console

Aurelia - Bundling

Step 1 - Installing Prerequisites

We can install aurelia-bundler by running the following command in command prompt −
C:\Users\username\Desktop\aureliaApp>npm install aurelia-bundler --save-dev
If you don't have gulp installed, you can install it by running this code −
C:\Users\username\Desktop\aureliaApp>npm install gulp
And we will also install require-dir package from npm.
C:\Users\username\Desktop\aureliaApp>npm install require-dir

Step 2 - Create Folders and Files

First let's create gulpfile.js file in apps root directory.
C:\Users\username\Desktop\aureliaApp>touch gulpfile.js
We will also need build folder. In this directory we will add another folder named tasks.
C:\Users\username\Desktop\aureliaApp>mkdir build
C:\Users\username\Desktop\aureliaApp\build>mkdir tasks
And we need to create bundle.js file inside tasks folder.
C:\Users\username\Desktop\aureliaApp\build\tasks>touch bundle.js

Step 3 - Gulp

We will use gulp as our task runner. We need to tell it to run the code from build\tasks\bundle.js.

gulpfile.js

  
require('require-dir')('build/tasks');
Now let's create the task that we need. This task will take our app, create dist/app-build.js and dist/vendor-build.js files. After bundling process is finished, the config.js file will also be updated. We can include all files and plugins we want to inject and minify.

bundle.js

var gulp = require('gulp');
var bundle = require('aurelia-bundler').bundle;

var config = {
   force: true,
   baseURL: '.',
   configPath: './config.js',
 
   bundles: {
      "dist/app-build": {
         includes: [
            '[*.js]',
            '*.html!text',
            '*.css!text',
         ],
   
         options: {
            inject: true,
            minify: true
         }
      },
  
      "dist/vendor-build": {
         includes: [
            'aurelia-bootstrapper',
            'aurelia-fetch-client',
            'aurelia-router',
            'aurelia-animator-css',
         ],
   
         options: {
            inject: true,
            minify: true
         }
      }
   }
};

gulp.task('bundle', function() {
   return bundle(config);
});  
The command prompt will inform us when bundling is finished.
Aurelia Bundling CMD

Aurelia - Tools

In this chapter we will show you how to set up and use aurelia-tools.

Step 1 - Root Folder

Let's create root folder where we will keep all Aurelia apps.
C:\Users\username\Desktop>mkdir aurelia-projects

Step 2 - Aurelia Tools

Inside aurelia-projects folder we will clone aurelia-tools repository from github.
C:\Users\username\Desktop\aurelia-projects>git clone https://github.com/aurelia/tools.git

Step 3 - Create New Project

When you want to start new Aurelia project, the recommended way is to use one of the aurelia-skeletons. Let's clone Aurelia skeletons from git.
C:\Users\username\Desktop\aurelia-projects>git clone https://github.com/aurelia/skeleton-navigation.git
We also need to install packages, modules and dependencies. You can choose between various skeleton apps. We will use skeleton-es2016.
C:\Users\username\Desktop\aurelia-projects\skeleton-navigation\skeleton-es2016>npm install
C:\Users\username\Desktop\aurelia-projects\skeleton-navigation\skeleton-es2016>jspm install
And finally we need to run the following code to build development environment.
C:\Users\username\Desktop\aurelia-projects\skeleton-navigation\skeleton-es2016>gulp build-dev-env

Step 4A - Update

If you want to update local repositories, you can run the following command.
C:\Users\username\Desktop\aurelia-projects\skeleton-navigation\skeleton-es2016>gulp update-own-deps

Step 4B - Pull

You can also pull Aurelia dependency without building.
C:\Users\username\Desktop\aurelia-projects\skeleton-navigation\skeleton-es2016>gulp pull-dev-env

Aurelia - Localization

Aurelia offers i18n plugin. In this chapter we will show you how to localize your app using this plugin.

Step 1 - Install Plugin

Open command prompt window and run the following code to install i18nplugin.
C:\Users\username\Desktop\aureliaApp>jspm install aurelia-i18n
We also need to install backend plugin.
C:\Users\username\Desktop\aureliaApp>jspm install npm:i18next-xhr-backend

Step 2 - Create Folders and files

In project root folder we need to create locale directory.
C:\Users\username\Desktop\aureliaApp>mkdir locale
In this folder you need to add new folders for any language you want. We will create en with translation.js file inside.
C:\Users\username\Desktop\aureliaApp\locale>mkdir en
C:\Users\username\Desktop\aureliaApp\locale\en>touch translation.json    

Step 3 - Using Plugin

You need to use manual bootstrapping to be able to use this plugin. Check our configuration chapter for more information. We need to add i18n plugin to main.js file.

main.js

import {I18N} from 'aurelia-i18n';
import XHR from 'i18next-xhr-backend';

export function configure(aurelia) {
   aurelia.use
   .standardConfiguration()
   .developmentLogging()
 
   .plugin('aurelia-i18n', (instance) => {
      // register backend plugin
      instance.i18next.use(XHR);

      // adapt options to your needs (see http://i18next.com/docs/options/)
      instance.setup({
         backend: {                                  
            loadPath: '/locales/{{lng}}/{{ns}}.json',
         },
    
         lng : 'de',
         attributes : ['t','i18n'],
         fallbackLng : 'en',
         debug : false
      });
   });

   aurelia.start().then(a => a.setRoot());
}

Step 4 - Translation JSON file

This is the file where you can set translation values. We will use an example from official documentation. The de-DE folder should actually be used for translating to German language, but we will use English phrases instead, for easier understanding.

translation.json

{
   "score": "Score: {{score}}",
   "lives": "{{count}} life remaining",
   "lives_plural": "{{count}} lives remaining",
   "lives_indefinite": "a life remaining",
   "lives_plural_indefinite": "some lives remaining",
   "friend": "A friend",
   "friend_male": "A boyfriend",
   "friend_female": "A girlfriend"
}

Step 5 - Setting Locale

We just need to import i18n plugin and set it to use JSON code from de-DEfolder.

app.js

import {I18N} from 'aurelia-i18n';

export class App {
   static inject = [I18N];
 
   constructor(i18n) {
      this.i18n = i18n;
      this.i18n
      .setLocale('de-DE')
  
      .then( () => {
         console.log('Locale is ready!');
      });
   }
}

Step 6 - View

There are couple of ways to translate data. We will use a custom ValueConverter named t. You can see in example below various ways of formatting data. Compare this with translation.json file and you will notice the patterns used for formatting.
<template>
   <p>
      Translation with Variables: <br />
      ${ 'score' | t: {'score': 13}}
   </p>

   <p>
      Translation singular: <br />
      ${ 'lives' | t: { 'count': 1 } }
   </p>

   <p>
      Translation plural: <br />
      ${ 'lives' | t: { 'count': 2 } }
   </p>

   <p>  
      Translation singular indefinite: <br />
      ${ 'lives' | t: { 'count': 1, indefinite_article: true  } }
   </p>

   <p>
      Translation plural indefinite: <br />
      ${ 'lives' | t: { 'count': 2, indefinite_article: true } }
   </p>

   <p>
      Translation without/with context: <br />
      ${ 'friend' | t } <br />
      ${ 'friend' | t: { context: 'male' } } <br />
      ${ 'friend' | t: { context: 'female' } }
   </p>
 
</template>
When we run the app, we will get the following output.
Aurelia Localization Example

Aurelia - Dialog

Aurelia offers a way to implement dialog (modal) window. In this chapter we will show you how to use it.

Step 1 - Install Dialog Plugin

Dialog plugin can be installed from command prompt window.
C:\Users\username\Desktop\aureliaApp>jspm install aurelia-dialog
For this plugin to work, we need to use manual bootstrapping. We covered this in our configuration chapter. Inside main.js file we need to add the aurelia-dialog plugin.

main.js

export function configure(aurelia) {
   aurelia.use
   .standardConfiguration()
   .developmentLogging()
   .plugin('aurelia-dialog'); 

   aurelia.start().then(() => aurelia.setRoot());
}

Step 2 - Create Folders and Files

First we will make new directory called modal. Let's place it inside components folder. Open the command prompt and run the following code.
C:\Users\username\Desktop\aureliaApp\src\components>mkdir modal
In this folder we will create two new files. These files will represent view and view-model for our modal.
C:\Users\username\Desktop\aureliaApp\src\components\modal>touch my-modal.html
C:\Users\username\Desktop\aureliaApp\src\components\modal>touch my-modal.js

Step 3 - Create Modal

First let's add view-model code. We need to import and inject dialog-controller. This controller is used for handling modal specific functionalities. In our example we are using it to centralize modal horizontally.

my-modal.js

import {inject} from 'aurelia-framework';
import {DialogController} from 'aurelia-dialog';

@inject(DialogController)

export class Prompt {

   constructor(controller){
      this.controller = controller;
      this.answer = null;

      controller.settings.centerHorizontalOnly = true;
   }

   activate(message) {
      this.message = message;
   }
}
The view code will look like this. The buttons when clicked will open or close the modal.

my-modal.html

<template>
   <ai-dialog>
      <ai-dialog-body>
         <h2>${message}</h2>
      </ai-dialog-body>

      <ai-dialog-footer>
         <button click.trigger = "controller.cancel()">Cancel</button>
         <button click.trigger = "controller.ok(message)">Ok</button>
      </ai-dialog-footer>
 
   </ai-dialog>
 
</template>

Step 4 - Triggering Modal

The last step is a function for triggering our modal. We need to import and inject DialogService. This service has method open where we can pass view-model from my-modal file, and model, so we can dynamically bind data.

app.js

import {DialogService} from 'aurelia-dialog';
import {inject} from 'aurelia-framework';
import {Prompt} from './components/modal/my-modal';

@inject(DialogService)

export class App {

   constructor(dialogService) {
      this.dialogService = dialogService;
   }

   openModal() {
      this.dialogService.open({viewModel: Prompt, model: 'Are you sure?' }).then(response => {
         console.log(response);
   
         if (!response.wasCancelled) {
            console.log('OK');
         } else {
            console.log('cancelled');
         }
         console.log(response.output);
      });
   }
};
And finally we will create button so we can call openModal function.

app.html

<template>
   <button click.trigger = "openModal()">OPEN MODAL</button>
<template>
If we run the app, we can click OPEN MODAL button to trigger new modal window.
Aurelia Dialog Modal