Tampilkan postingan dengan label Android. Tampilkan semua postingan

Kamis, 10 Agustus 2017

Android - XML Parser

XML stands for Extensible Mark-up Language.XML is a very popular format and commonly used for sharing data on the internet. This chapter explains how to parse the XML file and extract necessary information from it.
Android provides three types of XML parsers which are DOM,SAX and XMLPullParser. Among all of them android recommend XMLPullParser because it is efficient and easy to use. So we are going to use XMLPullParser for parsing XML.
The first step is to identify the fields in the XML data in which you are interested in. For example. In the XML given below we interested in getting temperature only.
<?xml version="1.0"?>
<current>
   
   <city id="2643743" name="London">
      <coord lon="-0.12574" lat="51.50853"/>
      <country>GB</country>
      <sun rise="2013-10-08T06:13:56" set="2013-10-08T17:21:45"/>
   </city>
   
   <temperature value="289.54" min="289.15" max="290.15" unit="kelvin"/>
   <humidity value="77" unit="%"/>
   <pressure value="1025" unit="hPa"/>
</current>

XML - Elements

An xml file consist of many components. Here is the table defining the components of an XML file and their description.
Sr.No Component & description
1 Prolog
An XML file starts with a prolog. The first line that contains the information about a file is prolog
2 Events
An XML file has many events. Event could be like this. Document starts , Document ends, Tag start , Tag end and Text e.t.c
3 Text
Apart from tags and events, and xml file also contains simple text. Such as GB is a text in the country tag.
4 Attributes
Attributes are the additional properties of a tag such as value e.t.c

XML - Parsing

In the next step, we will create XMLPullParser object , but in order to create that we will first create XmlPullParserFactory object and then call its newPullParser() method to create XMLPullParser. Its syntax is given below −
private XmlPullParserFactory xmlFactoryObject = XmlPullParserFactory.newInstance();
private XmlPullParser myparser = xmlFactoryObject.newPullParser();
The next step involves specifying the file for XmlPullParser that contains XML. It could be a file or could be a Stream. In our case it is a stream.Its syntax is given below −
myparser.setInput(stream, null);
The last step is to parse the XML. An XML file consist of events, Name, Text, AttributesValue e.t.c. So XMLPullParser has a separate function for parsing each of the component of XML file. Its syntax is given below −
int event = myParser.getEventType();
while (event != XmlPullParser.END_DOCUMENT)  {
   String name=myParser.getName();
   switch (event){
      case XmlPullParser.START_TAG:
      break;
      
      case XmlPullParser.END_TAG:
      if(name.equals("temperature")){
         temperature = myParser.getAttributeValue(null,"value");
      }
      break;
   }   
   event = myParser.next();      
}
The method getEventType returns the type of event that happens. e.g: Document start , tag start e.t.c. The method getName returns the name of the tag and since we are only interested in temperature , so we just check in conditional statement that if we got a temperature tag , we call the method getAttributeValue to return us the value of temperature tag.
Apart from the these methods, there are other methods provided by this class for better parsing XML files. These methods are listed below −
Sr.No Method & description
1 getAttributeCount()
This method just Returns the number of attributes of the current start tag
2 getAttributeName(int index)
This method returns the name of the attribute specified by the index value
3 getColumnNumber()
This method returns the Returns the current column number, starting from 0.
4 getDepth()
This method returns Returns the current depth of the element.
5 getLineNumber()
Returns the current line number, starting from 1.
6 getNamespace()
This method returns the name space URI of the current element.
7 getPrefix()
This method returns the prefix of the current element
8 getName()
This method returns the name of the tag
9 getText()
This method returns the text for that particular element
10 isWhitespace()
This method checks whether the current TEXT event contains only whitespace characters.

Example

Here is an example demonstrating the use of XML DOM Parser. It creates a basic application that allows you to parse XML.
To experiment with this example, you can run this on an actual device or in an emulator.
Steps Description
1 You will use Android studio to create an Android application under a package com.example.sairamkrishna.myapplication.
2 Modify src/MainActivity.java file to add necessary code.
3 Modify the res/layout/activity_main to add respective XML components
4 Create a new XML file under Assets Folder/file.xml
5 Modify AndroidManifest.xml to add necessary internet permission
6 Run the application and choose a running android device and install the application on it and verify the results
Following is the content of the modified main activity file MainActivity.java.
package com.example.sairamkrishna.myapplication;

import java.io.InputStream;
import javax.xml.parsers.DocumentBuilder;
import javax.xml.parsers.DocumentBuilderFactory;
import org.w3c.dom.Document;
import org.w3c.dom.Element;
import org.w3c.dom.Node;
import org.w3c.dom.NodeList;
import android.app.Activity;
import android.os.Bundle;
import android.widget.TextView;

public class MainActivity extends Activity {
   TextView tv1;

   @Override
   public void onCreate(Bundle savedInstanceState) {
      super.onCreate(savedInstanceState);
      setContentView(R.layout.activity_main);
      tv1=(TextView)findViewById(R.id.textView1);
  
      try {
         InputStream is = getAssets().open("file.xml");

         DocumentBuilderFactory dbFactory = DocumentBuilderFactory.newInstance();
         DocumentBuilder dBuilder = dbFactory.newDocumentBuilder();
         Document doc = dBuilder.parse(is);

         Element element=doc.getDocumentElement();
         element.normalize();

         NodeList nList = doc.getElementsByTagName("employee");
   
         for (int i=0; i<nList.getLength(); i++) {

            Node node = nList.item(i);
            if (node.getNodeType() == Node.ELEMENT_NODE) {
               Element element2 = (Element) node;
               tv1.setText(tv1.getText()+"\nName : " + getValue("name", element2)+"\n");
               tv1.setText(tv1.getText()+"Surname : " + getValue("surname", element2)+"\n");
               tv1.setText(tv1.getText()+"-----------------------");
            }
         }
   
      } catch (Exception e) {e.printStackTrace();}

   }
 
   private static String getValue(String tag, Element element) {
      NodeList nodeList = element.getElementsByTagName(tag).item(0).getChildNodes();
      Node node = nodeList.item(0);
      return node.getNodeValue();
   }

}
Following is the content of Assets/file.xml.
<?xml version="1.0"?>
<records>
   <employee>
      <name>Sairamkrishna</name>
      <surname>Mammahe</surname>
      <salary>50000</salary>
   </employee>
 
   <employee>
      <name>Gopal </name>
      <surname>Varma</surname>
      <salary>60000</salary>
   </employee>
 
   <employee>
      <name>Raja</name>
      <surname>Hr</surname>
      <salary>70000</salary>
   </employee>
 
</records>
Following is the modified content of the xml res/layout/activity_main.xml.
<?xml version="1.0" encoding="utf-8"?>
<RelativeLayout xmlns:android="http://schemas.android.com/apk/res/android"
   xmlns:tools="http://schemas.android.com/tools"
   android:layout_width="match_parent"
   android:layout_height="match_parent"
   android:paddingBottom="@dimen/activity_vertical_margin"
   android:paddingLeft="@dimen/activity_horizontal_margin"
   android:paddingRight="@dimen/activity_horizontal_margin"
   android:paddingTop="@dimen/activity_vertical_margin"
   tools:context=".MainActivity">

   <TextView
      android:id="@+id/textView1"
      android:layout_width="wrap_content"
      android:layout_height="wrap_content" />
</RelativeLayout>
Following is the content of AndroidManifest.xml file.
<?xml version="1.0" encoding="utf-8"?>
<manifest xmlns:android="http://schemas.android.com/apk/res/android"
   package="com.example.sairamkrishna.myapplication" >
   <application
      android:allowBackup="true"
      android:icon="@mipmap/ic_launcher"
      android:label="@string/app_name"
      android:theme="@style/AppTheme" >
      
      <activity
         android:name=".MainActivity"
         android:label="@string/app_name" >
         
         <intent-filter>
            <action android:name="android.intent.action.MAIN" />
            <category android:name="android.intent.category.LAUNCHER" />
         </intent-filter>
      
      </activity>
   
   </application>
</manifest>
Let's try to run our application we just modified. I assume you had created your AVD while doing environment setup. To run the app from Android studio, open one of your project's activity files and click Run Eclipse Run Icon icon from the toolbar. Android studio installs the app on your AVD and starts it and if everything is fine with your setup and application, it will display following Emulator window −
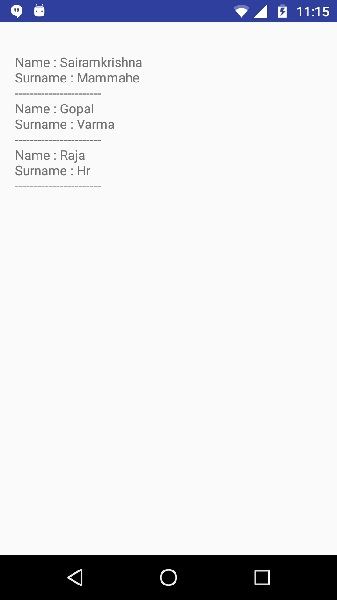
Anroid XML Parser Tutorial


Android - Widgets

A widget is a small gadget or control of your android application placed on the home screen. Widgets can be very handy as they allow you to put your favourite applications on your home screen in order to quickly access them. You have probably seen some common widgets, such as music widget, weather widget, clock widget e.t.c
Widgets could be of many types such as information widgets, collection widgets, control widgets and hybrid widgets. Android provides us a complete framework to develop our own widgets.

Widget - XML file

In order to create an application widget, first thing you need is AppWidgetProviderInfo object, which you will define in a separate widget XML file. In order to do that, right click on your project and create a new folder called xml. Now right click on the newly created folder and create a new XML file. The resource type of the XML file should be set to AppWidgetProvider. In the xml file, define some properties which are as follows −
<appwidget-provider 
   xmlns:android="http://schemas.android.com/apk/res/android" 
   android:minWidth="146dp" 
   android:updatePeriodMillis="0" 
   android:minHeight="146dp" 
   android:initialLayout="@layout/activity_main">
</appwidget-provider>

Widget - Layout file

Now you have to define the layout of your widget in your default XML file. You can drag components to generate auto xml.

Widget - Java file

After defining layout, now create a new JAVA file or use existing one, and extend it with AppWidgetProvider class and override its update method as follows.
In the update method, you have to define the object of two classes which are PendingIntent and RemoteViews. Its syntax is −
PendingIntent pending = PendingIntent.getActivity(context, 0, intent, 0);
RemoteViews views = new RemoteViews(context.getPackageName(), R.layout.activity_main);
In the end you have to call an update method updateAppWidget() of the AppWidgetManager class. Its syntax is −
appWidgetManager.updateAppWidget(currentWidgetId,views);  
A part from the updateAppWidget method, there are other methods defined in this class to manipulate widgets. They are as follows −
Sr.No Method & Description
1 onDeleted(Context context, int[] appWidgetIds)
This is called when an instance of AppWidgetProvider is deleted.
2 onDisabled(Context context)
This is called when the last instance of AppWidgetProvider is deleted
3 onEnabled(Context context)
This is called when an instance of AppWidgetProvider is created.
4 onReceive(Context context, Intent intent)
It is used to dispatch calls to the various methods of the class

Widget - Manifest file

You also have to declare the AppWidgetProvider class in your manifest file as follows:
<receiver android:name="ExampleAppWidgetProvider" >
   
   <intent-filter>
      <action android:name="android.appwidget.action.APPWIDGET_UPDATE" />
   </intent-filter>
   
   <meta-data android:name="android.appwidget.provider"
      android:resource="@xml/example_appwidget_info" />
</receiver>

Example

Here is an example demonstrating the use of application Widget. It creates a basic widget applications that will open this current website in the browser.
To experiment with this example, you need to run this on an actual device on which internet is running.
Steps Description
1 You will use Android studio to create an Android application under a package com.example.sairamkrishna.myapplication.
2 Modify src/MainActivity.java file to add widget code.
3 Modify the res/layout/activity_main to add respective XML components
4 Create a new folder and xml file under res/xml/mywidget.xml to add respective XML components
5 Modify the AndroidManifest.xml to add the necessary permissions
6 Run the application and choose a running android device and install the application on it and verify the results.
Following is the content of the modified MainActivity.java.
package com.example.sairamkrishna.myapplication;

import android.app.PendingIntent;
import android.appwidget.AppWidgetManager;
import android.appwidget.AppWidgetProvider;
import android.content.Context;
import android.content.Intent;
import android.net.Uri;
import android.widget.RemoteViews;
import android.widget.Toast;

public class MainActivity extends AppWidgetProvider{
   public void onUpdate(Context context, AppWidgetManager appWidgetManager,int[] appWidgetIds) {
      for(int i=0; i<appWidgetIds.length; i++){
         int currentWidgetId = appWidgetIds[i];
         String url = "http://www.tutorialspoint.com";
         
         Intent intent = new Intent(Intent.ACTION_VIEW);
         intent.addFlags(Intent.FLAG_ACTIVITY_NEW_TASK);
         intent.setData(Uri.parse(url));
         
         PendingIntent pending = PendingIntent.getActivity(context, 0,intent, 0);
         RemoteViews views = new RemoteViews(context.getPackageName(),R.layout.activity_main);
         
         views.setOnClickPendingIntent(R.id.button, pending);
         appWidgetManager.updateAppWidget(currentWidgetId,views);
         Toast.makeText(context, "widget added", Toast.LENGTH_SHORT).show();
      }
   }
}
Following is the modified content of the xml res/layout/activity_main.xml.
<?xml version="1.0" encoding="utf-8"?>
<RelativeLayout xmlns:android="http://schemas.android.com/apk/res/android"
   xmlns:tools="http://schemas.android.com/tools" android:layout_width="match_parent"
   android:layout_height="match_parent" android:paddingLeft="@dimen/activity_horizontal_margin"
   android:paddingRight="@dimen/activity_horizontal_margin"
   android:paddingTop="@dimen/activity_vertical_margin"
   android:paddingBottom="@dimen/activity_vertical_margin"
   tools:context=".MainActivity"
   android:transitionGroup="true">
   
   <TextView
      android:layout_width="wrap_content"
      android:layout_height="wrap_content"
      android:text="Tutorials point"
      android:id="@+id/textView"
      android:layout_centerHorizontal="true"
      android:textColor="#ff3412ff"
      android:textSize="35dp" />
      
   <Button
      android:layout_width="wrap_content"
      android:layout_height="wrap_content"
      android:text="Widget"
      android:id="@+id/button"
      android:layout_centerHorizontal="true"
      android:layout_marginTop="61dp"
      android:layout_below="@+id/textView" />

</RelativeLayout>
Following is the content of the res/xml/mywidget.xml.
<?xml version="1.0" encoding="utf-8"?>
<appwidget-provider 
   xmlns:android="http://schemas.android.com/apk/res/android" 
   android:minWidth="146dp" 
   android:updatePeriodMillis="0" 
   android:minHeight="146dp" 
   android:initialLayout="@layout/activity_main">
</appwidget-provider>
Following is the content of the res/values/string.xml.
<resources>
   <string name="app_name">My Application</string>
</resources>
Following is the content of AndroidManifest.xml file.
<?xml version="1.0" encoding="utf-8"?>
<manifest xmlns:android="http://schemas.android.com/apk/res/android"
   package="com.example.sairamkrishna.myapplication" >
   
   <application
      android:allowBackup="true"
      android:icon="@mipmap/ic_launcher"
      android:label="@string/app_name"
      android:theme="@style/AppTheme" >
      <receiver android:name=".MainActivity">
      
      <intent-filter>
         <action android:name="android.appwidget.action.APPWIDGET_UPDATE"></action>
      </intent-filter>
      
      <meta-data android:name="android.appwidget.provider"
         android:resource="@xml/mywidget"></meta-data>
      
      </receiver>
   
   </application>
</manifest>
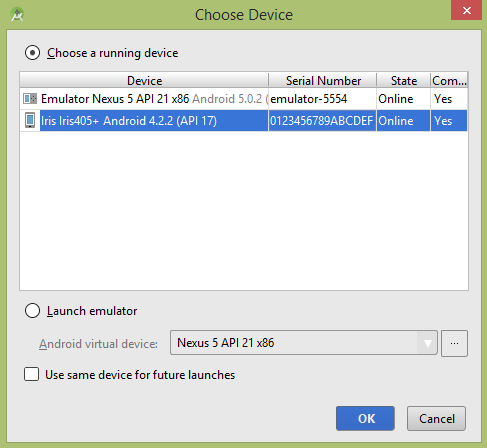
Let's try to run your application. I assume you have connected your actual Android Mobile device with your computer. To run the app from Android studio, open one of your project's activity files and click Run Eclipse Run Icon icon from the tool bar. Before starting your application, Android studio will display following window to select an option where you want to run your Android application.
Anroid Widget Tutorial
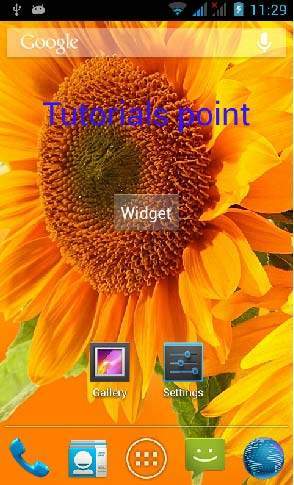
Select your mobile device as an option and then check your mobile device which will display your default screen −
Anroid Widget Tutorial
Go to your widget section and add your created widget to the desktop or home screen. It would look something like this −
Anroid Widget Tutorial
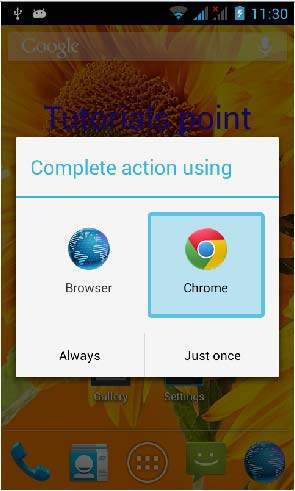
Now just tap on the widget button that appears, to launch the browser. But before that please make sure that you are connected to the internet. After pressing the button , the following screen would appear −
Anroid Widget Tutorial
Note. By just changing the url in the java file, your widget will open your desired website in the browser.

Android - Wi-Fi

Android allows applications to access to view the access the state of the wireless connections at very low level. Application can access almost all the information of a wifi connection.
The information that an application can access includes connected network's link speed,IP address, negotiation state, other networks information. Applications can also scan, add, save, terminate and initiate Wi-Fi connections.
Android provides WifiManager API to manage all aspects of WIFI connectivity. We can instantiate this class by calling getSystemService method. Its syntax is given below −
WifiManager mainWifiObj;
mainWifiObj = (WifiManager) getSystemService(Context.WIFI_SERVICE); 
In order to scan a list of wireless networks, you also need to register your BroadcastReceiver. It can be registered using registerReceiver method with argument of your receiver class object. Its syntax is given below −
class WifiScanReceiver extends BroadcastReceiver {
   public void onReceive(Context c, Intent intent) {
   }
}

WifiScanReceiver wifiReciever = new WifiScanReceiver();
registerReceiver(wifiReciever, new IntentFilter(WifiManager.SCAN_RESULTS_AVAILABLE_ACTION));  
The wifi scan can be start by calling the startScan method of the WifiManager class. This method returns a list of ScanResult objects. You can access any object by calling the get method of list. Its syntax is given below −
List<ScanResult> wifiScanList = mainWifiObj.getScanResults();
String data = wifiScanList.get(0).toString();
Apart from just Scanning, you can have more control over your WIFI by using the methods defined in WifiManager class. They are listed as follows −
Sr.No Method & Description
1 addNetwork(WifiConfiguration config)
This method add a new network description to the set of configured networks.
2 createWifiLock(String tag)
This method creates a new WifiLock.
3 disconnect()
This method disassociate from the currently active access point.
4 enableNetwork(int netId, boolean disableOthers)
This method allow a previously configured network to be associated with.
5 getWifiState()
This method gets the Wi-Fi enabled state
6 isWifiEnabled()
This method return whether Wi-Fi is enabled or disabled.
7 setWifiEnabled(boolean enabled)
This method enable or disable Wi-Fi.
8 updateNetwork(WifiConfiguration config)
This method update the network description of an existing configured network.

Example

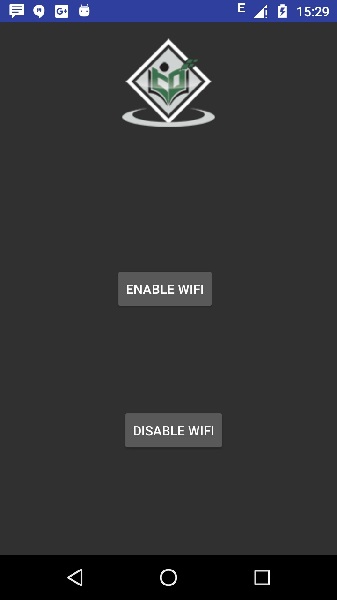
Here is an example demonstrating the use of WIFI. It creates a basic application that open your wifi and close your wifi
To experiment with this example, you need to run this on an actual device on which wifi is turned on.
Steps Description
1 You will use Android studio to create an Android application under a package com.example.sairamkrishna.myapplication.
2 Modify src/MainActivity.java file to add WebView code.
3 Modify the res/layout/activity_main to add respective XML components
4 Modify the AndroidManifest.xml to add the necessary permissions
5 Run the application and choose a running android device and install the application on it and verify the results.
Following is the content of the modified main activity file src/MainActivity.java.
package com.example.sairamkrishna.myapplication;

import android.net.wifi.WifiManager;
import android.os.Bundle;
import android.app.Activity;
import android.content.Context;
import android.view.View;
import android.view.View.OnClickListener;
import android.widget.Button;

public class MainActivity extends Activity {
   Button enableButton,disableButton;
   @Override
   protected void onCreate(Bundle savedInstanceState) {
      super.onCreate(savedInstanceState);
      setContentView(R.layout.activity_main);

      enableButton=(Button)findViewById(R.id.button1);
      disableButton=(Button)findViewById(R.id.button2);

      enableButton.setOnClickListener(new OnClickListener(){
         public void onClick(View v){
            WifiManager wifi = (WifiManager) getSystemService(Context.WIFI_SERVICE);
            wifi.setWifiEnabled(true);
         }
      });
  
      disableButton.setOnClickListener(new OnClickListener(){
         public void onClick(View v){
            WifiManager wifi = (WifiManager) getSystemService(Context.WIFI_SERVICE);
            wifi.setWifiEnabled(false);
         }
      });
   }
}
Following is the modified content of the xml res/layout/activity_main.xml.
<?xml version="1.0" encoding="utf-8"?>
<RelativeLayout xmlns:android="http://schemas.android.com/apk/res/android"
   xmlns:tools="http://schemas.android.com/tools" android:layout_width="match_parent"
   android:layout_height="match_parent"
   android:paddingLeft="@dimen/activity_horizontal_margin"
   android:paddingRight="@dimen/activity_horizontal_margin"
   android:paddingTop="@dimen/activity_vertical_margin"
   android:paddingBottom="@dimen/activity_vertical_margin" tools:context=".MainActivity">
 
   <ImageView
      android:layout_width="wrap_content"
      android:layout_height="wrap_content"
      android:id="@+id/imageView"
      android:src="@drawable/abc"
      android:layout_alignParentTop="true"
      android:layout_centerHorizontal="true" />
  
   <Button
      android:id="@+id/button1"
      android:layout_width="wrap_content"
      android:layout_height="wrap_content"
      android:layout_marginLeft="76dp"
      android:text="Enable Wifi"
      android:layout_centerVertical="true"
      android:layout_alignEnd="@+id/imageView" />

   <Button
      android:id="@+id/button2"
      android:layout_width="wrap_content"
      android:layout_height="wrap_content"
      android:text="Disable Wifi"
      android:layout_marginBottom="93dp"
      android:layout_alignParentBottom="true"
      android:layout_alignStart="@+id/imageView" />

</RelativeLayout>
Following is the content of AndroidManifest.xml file.
<?xml version="1.0" encoding="utf-8"?>
<manifest xmlns:android="http://schemas.android.com/apk/res/android"
   package="com.example.sairamkrishna.myapplication" >
   <uses-permission android:name="android.permission.ACCESS_WIFI_STATE" />
   <uses-permission android:name="android.permission.CHANGE_WIFI_STATE" />
   
   <application
      android:allowBackup="true"
      android:icon="@mipmap/ic_launcher"
      android:label="@string/app_name"
      android:theme="@style/AppTheme" >
      
      <activity
         android:name=".MainActivity"
         android:label="@string/app_name" >
         
         <intent-filter>
            <action android:name="android.intent.action.MAIN" />
            <category android:name="android.intent.category.LAUNCHER" />
         </intent-filter>
         
      </activity>
      
   </application>
</manifest>
Let's try to run your application. I assume you have connected your actual Android Mobile device with your computer. To run the app from Android studio, open one of your project's activity files and click Run Eclipse Run Icon icon from the toolbar. Before starting your application, Android studio will display following window to select an option where you want to run your Android application.
Anroid Wi-Fi Tutorial
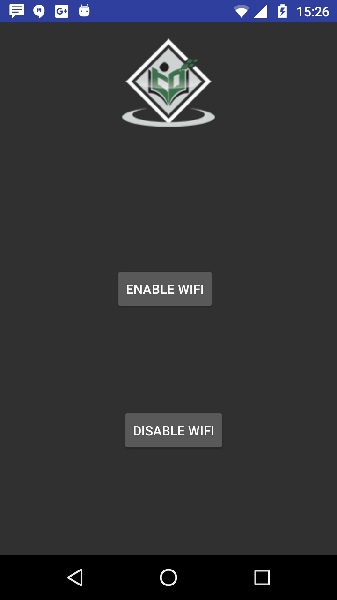
Select your mobile device as an option and It will shows the following image−
Anroid Wi-Fi Tutorial
Now click on disable wifi button.then the sample output should be like this −
android_wifi_tutorials

Android - WebView

WebView is a view that display web pages inside your application. You can also specify HTML string and can show it inside your application using WebView. WebView makes turns your application to a web application.
In order to add WebView to your application, you have to add <WebView> element to your xml layout file. Its syntax is as follows −
<WebView  xmlns:android="http://schemas.android.com/apk/res/android"
   android:id="@+id/webview"
   android:layout_width="fill_parent"
   android:layout_height="fill_parent"
/>
In order to use it, you have to get a reference of this view in Java file. To get a reference, create an object of the class WebView. Its syntax is −
WebView browser = (WebView) findViewById(R.id.webview);
In order to load a web url into the WebView, you need to call a method loadUrl(String url) of the WebView class, specifying the required url. Its syntax is:
browser.loadUrl("http://www.tutorialspoint.com");
Apart from just loading url, you can have more control over your WebView by using the methods defined in WebView class. They are listed as follows −
Sr.No Method & Description
1 canGoBack()
This method specifies the WebView has a back history item.
2 canGoForward()
This method specifies the WebView has a forward history item.
3 clearHistory()
This method will clear the WebView forward and backward history.
4 destroy()
This method destroy the internal state of WebView.
5 findAllAsync(String find)
This method find all instances of string and highlight them.
6 getProgress()
This method gets the progress of the current page.
7 getTitle()
This method return the title of the current page.
8 getUrl()
This method return the url of the current page.
If you click on any link inside the webpage of the WebView, that page will not be loaded inside your WebView. In order to do that you need to extend your class from WebViewClient and override its method. Its syntax is −
private class MyBrowser extends WebViewClient {
   @Override
   public boolean shouldOverrideUrlLoading(WebView view, String url) {
      view.loadUrl(url);
      return true;
   }
}

Example

Here is an example demonstrating the use of WebView Layout. It creates a basic web application that will ask you to specify a url and will load this url website in the WebView.
To experiment with this example, you need to run this on an actual device on which internet is running.
Steps Description
1 You will use Android studio to create an Android application under a package com.example.sairamkrishna.myapplication.
2 Modify src/MainActivity.java file to add WebView code.
3 Modify the res/layout/activity_main to add respective XML components
4 Modify the AndroidManifest.xml to add the necessary permissions
5 Run the application and choose a running android device and install the application on it and verify the results.
Following is the content of the modified main activity file src/MainActivity.java.
package com.example.sairamkrishna.myapplication;
import android.app.Activity;
import android.os.Bundle;

import android.view.View;
import android.webkit.WebView;
import android.webkit.WebViewClient;
import android.widget.Button;
import android.widget.EditText;


public class MainActivity extends Activity  {
   Button b1;
   EditText ed1;

   private WebView wv1;
   @Override
   protected void onCreate(Bundle savedInstanceState) {
      super.onCreate(savedInstanceState);
      setContentView(R.layout.activity_main);

      b1=(Button)findViewById(R.id.button);
      ed1=(EditText)findViewById(R.id.editText);

      wv1=(WebView)findViewById(R.id.webView);
      wv1.setWebViewClient(new MyBrowser());

      b1.setOnClickListener(new View.OnClickListener() {
         @Override
         public void onClick(View v) {
            String url = ed1.getText().toString();

            wv1.getSettings().setLoadsImagesAutomatically(true);
            wv1.getSettings().setJavaScriptEnabled(true);
            wv1.setScrollBarStyle(View.SCROLLBARS_INSIDE_OVERLAY);
            wv1.loadUrl(url);
         }
      });
   }

   private class MyBrowser extends WebViewClient {
      @Override
      public boolean shouldOverrideUrlLoading(WebView view, String url) {
         view.loadUrl(url);
         return true;
      }
   }
}
Following is the modified content of the xml res/layout/activity_main.xml.
In the following code abc indicates the logo of tutorialspoint.com
<?xml version="1.0" encoding="utf-8"?>
<RelativeLayout xmlns:android="http://schemas.android.com/apk/res/android"
   xmlns:tools="http://schemas.android.com/tools" android:layout_width="match_parent"
   android:layout_height="match_parent" android:paddingLeft="@dimen/activity_horizontal_margin"
   android:paddingRight="@dimen/activity_horizontal_margin"
   android:paddingTop="@dimen/activity_vertical_margin"
   android:paddingBottom="@dimen/activity_vertical_margin" tools:context=".MainActivity">
   
   <TextView android:text="WebView" android:layout_width="wrap_content"
      android:layout_height="wrap_content"
      android:id="@+id/textview"
      android:textSize="35dp"
      android:layout_alignParentTop="true"
      android:layout_centerHorizontal="true" />
      
   <TextView
      android:layout_width="wrap_content"
      android:layout_height="wrap_content"
      android:text="Tutorials point"
      android:id="@+id/textView"
      android:layout_below="@+id/textview"
      android:layout_centerHorizontal="true"
      android:textColor="#ff7aff24"
      android:textSize="35dp" />
      
   <EditText
      android:layout_width="wrap_content"
      android:layout_height="wrap_content"
      android:id="@+id/editText"
      android:hint="Enter Text"
      android:focusable="true"
      android:textColorHighlight="#ff7eff15"
      android:textColorHint="#ffff25e6"
      android:layout_marginTop="46dp"
      android:layout_below="@+id/imageView"
      android:layout_alignParentLeft="true"
      android:layout_alignParentStart="true"
      android:layout_alignRight="@+id/imageView"
      android:layout_alignEnd="@+id/imageView" />
      
   <ImageView
      android:layout_width="wrap_content"
      android:layout_height="wrap_content"
      android:id="@+id/imageView"
      android:src="@drawable/abc"
      android:layout_below="@+id/textView"
      android:layout_centerHorizontal="true" />
      
   <Button
      android:layout_width="wrap_content"
      android:layout_height="wrap_content"
      android:text="Enter"
      android:id="@+id/button"
      android:layout_alignTop="@+id/editText"
      android:layout_toRightOf="@+id/imageView"
      android:layout_toEndOf="@+id/imageView" />
      
   <WebView
      android:layout_width="wrap_content"
      android:layout_height="wrap_content"
      android:id="@+id/webView"
      android:layout_below="@+id/button"
      android:layout_alignParentLeft="true"
      android:layout_alignParentStart="true"
      android:layout_alignParentRight="true"
      android:layout_alignParentEnd="true"
      android:layout_alignParentBottom="true" />
      
</RelativeLayout>
Following is the content of the res/values/string.xml.
<resources>
   <string name="app_name">My Application</string>
</resources>
Following is the content of AndroidManifest.xml file.
<?xml version="1.0" encoding="utf-8"?>
<manifest xmlns:android="http://schemas.android.com/apk/res/android"
   package="com.example.sairamkrishna.myapplication" >
   <uses-permission android:name="android.permission.INTERNET" />
   <application
      android:allowBackup="true"
      android:icon="@mipmap/ic_launcher"
      android:label="@string/app_name"
      android:theme="@style/AppTheme" >
      
      <activity
         android:name=".MainActivity"
         android:label="@string/app_name" >
         
         <intent-filter>
            <action android:name="android.intent.action.MAIN" />
            <category android:name="android.intent.category.LAUNCHER" />
         </intent-filter>
      
      </activity>
      
   </application>
</manifest>
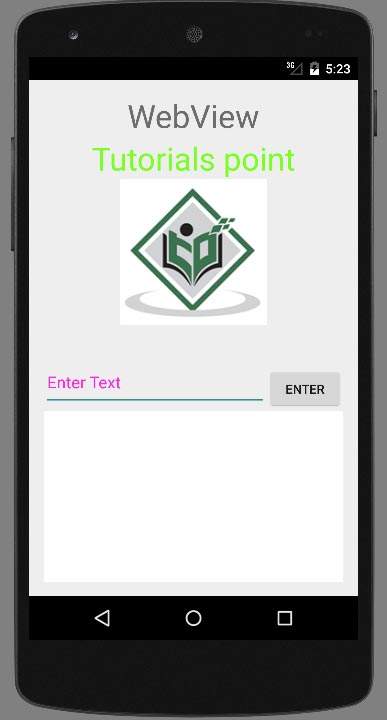
Let's try to run your WebView application. To run the app from Android studio, open one of your project's activity files and click Run Eclipse Run Icon icon from the toolbar. Android studio will display as shown below
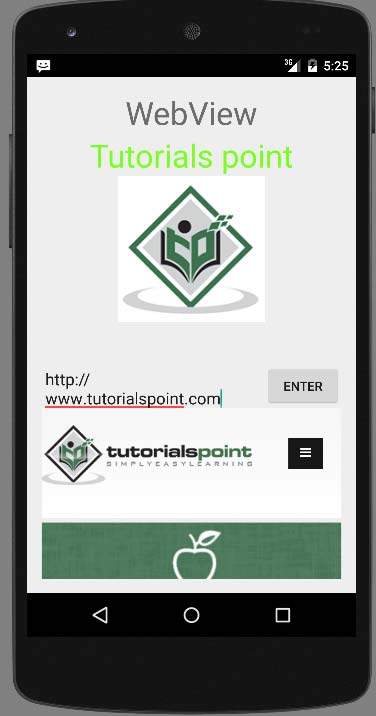
Now just specify a url on the url field and press the browse button that appears,to launch the website. But before that please make sure that you are connected to the internet. After pressing the button, the following screen would appear −
Android WebView Tutorial
Note. By just changing the url in the url field, your WebView will open your desired website.
Android WebView Tutorial

Android - UI Testing

Android SDK provides the following tools to support automated, functional UI testing on your application.
  • uiautomatorviewer
  • uiautomator

uiautomatorviewer

A GUI tool to scan and analyse the UI components of an Android application.
The uiautomatorviewer tool provides a convenient visual interface to inspect the layout hierarchy and view the properties of the individual UI components that are displayed on the test device. Using this information, you can later create uiautomator tests with selector objects that target specific UI components to test.
To analyse the UI components of the application that you want to test, perform the following steps after installing the application given in the example.
  • Connect your Android device to your development machine
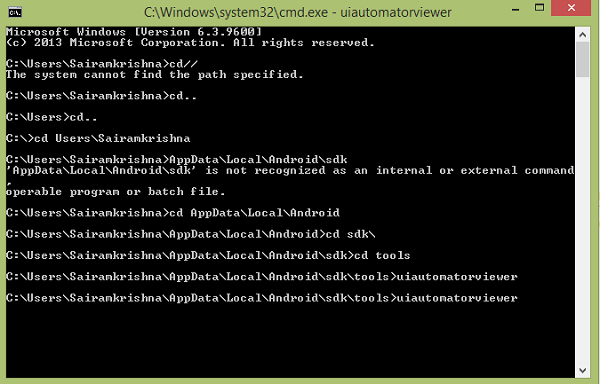
  • Open a terminal window and navigate to <android-sdk>/tools/
  • Run the tool with this command
uiautomatorviewer
Commands would be followed as shown below
Android UI Testing Tutorial
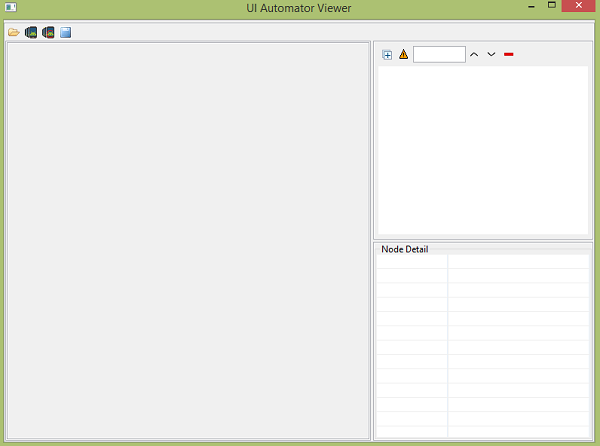
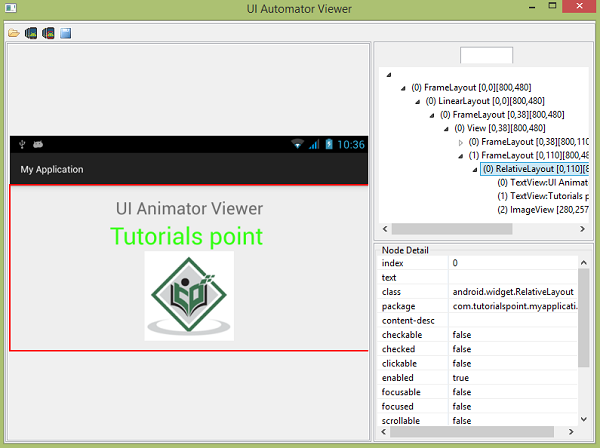
You will see the following window appear. It is the default window of the UI Automator Viewer.
Android UI Testing Tutorial
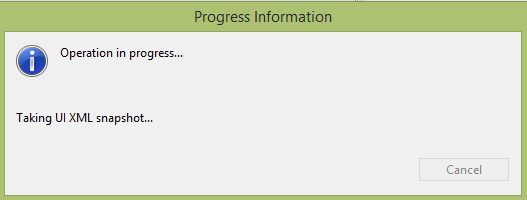
  • Click on the devices icon at the top right corner. It will start taking the UI XML snapshot of the screen currently opened in the device. It would be something like this.
Android UI Testing Tutorial
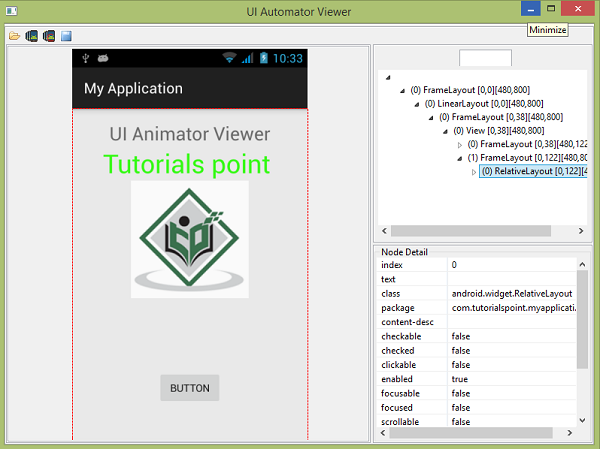
After that, you will see the snapshot of your device screen in the uiautomatorviewer window.
Android UI Testing Tutorial
On the right side of this window, you will see two partitions. The upper partition explains the Nodes structure, the way the UI components are arranged and contained. Clicking on each node gives detail in the lower partition.
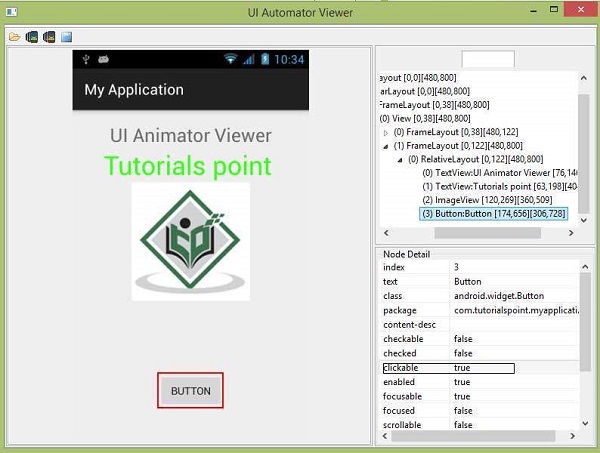
As an example, consider the below figure. When you click on the button, you can see in the upper partition that Button is selected, and in the lower partition, its details are shown. Since this button is click able, that's why its property of click able is set to true.
Android UI Testing Tutorial
UI Automator Viewer also helps you to examine your UI in different orientations. For example, just change your device orientation to landscape, and again capture the screen shot. It is shown in the figure below −
Android UI Testing Tutorial

uiautomator

Now you can create your own test cases and run it with uiautomatorviewer to examine them. In order to create your own test case, you need to perform the following steps −
  • From the Project Explorer, right-click on the new project that you created, then select Properties > Java Build Path, and do the following −
  • Click Add Library > JUnit then select JUnit3 to add JUnit support.
  • Click Add External JARs... and navigate to the SDK directory. Under the platforms directory, select the latest SDK version and add both the uiautomator.jar and android.jar files.
  • Extend your class with UiAutomatorTestCase
  • Right the necessary test cases.
  • Once you have coded your test, follow these steps to build and deploy your test JAR to your target Android test device.
  • Create the required build configuration files to build the output JAR. To generate the build configuration files, open a terminal and run the following command:
<android-sdk>/tools/android create uitest-project -n <name> -t 1 -p <path>
  • The <name> is the name of the project that contains your uiautomator test source files, and the <path> is the path to the corresponding project directory.
  • From the command line, set the ANDROID_HOME variable.
set ANDROID_HOME=<path_to_your_sdk>
  • Go to the project directory where your build.xml file is located and build your test JAR.
ant build
  • Deploy your generated test JAR file to the test device by using the adb push command.
adb push <path_to_output_jar> /data/local/tmp/
  • Run your test by following command −
adb shell uiautomator runtest LaunchSettings.jar -c com.uia.example.my.LaunchSettings

Example

The below example demonstrates the use of UITesting. It crates a basic application which can be used for uiautomatorviewer.
To experiment with this example, you need to run this on an actual device and then follow the uiautomatorviewer steps explained in the beginning.
Steps Description
1 You will use Android studio to create an Android application under a package com.tutorialspoint.myapplication.
2 Modify src/MainActivity.java file to add Activity code.
3 Modify layout XML file res/layout/activity_main.xml add any GUI component if required.
4 Create src/second.java file to add Activity code.
5 Modify layout XML file res/layout/view.xml add any GUI component if required.
6 Run the application and choose a running android device and install the application on it and verify the results.
Here is the content of MainActivity.java.
package com.tutorialspoint.myapplication;

import android.content.Intent;
import android.support.v7.app.ActionBarActivity;
import android.os.Bundle;
import android.view.View;
import android.widget.Button;

public class MainActivity extends ActionBarActivity {
   Button b1;

   @Override
   protected void onCreate(Bundle savedInstanceState) {
      super.onCreate(savedInstanceState);
      setContentView(R.layout.activity_main);

      b1=(Button)findViewById(R.id.button);
      b1.setOnClickListener(new View.OnClickListener() {
         @Override
         public void onClick(View v) {
            Intent in =new Intent(MainActivity.this,second.class);
            startActivity(in);
         }
      });
   }
}
Here is the content of second.java.
package com.tutorialspoint.myapplication;

import android.app.Activity;
import android.os.Bundle;
import android.view.View;
import android.widget.Button;
import android.widget.Toast;

public class second extends Activity {
   @Override
   protected void onCreate(Bundle savedInstanceState) {
      super.onCreate(savedInstanceState);
      setContentView(R.layout.view);
      Button b1=(Button)findViewById(R.id.button2);
      
      b1.setOnClickListener(new View.OnClickListener() {
         @Override
         public void onClick(View v) {
            Toast.makeText(second.this,"Thanks",Toast.LENGTH_LONG).show();
         }
      });
   }
}
Here is the content of activity_main.xml
In the following code abc indicates the logo of tutorialspoint.com
<?xml version="1.0" encoding="utf-8"?>
<RelativeLayout xmlns:android="http://schemas.android.com/apk/res/android"
   xmlns:tools="http://schemas.android.com/tools" android:layout_width="match_parent"
   android:layout_height="match_parent" android:paddingLeft="@dimen/activity_horizontal_margin"
   android:paddingRight="@dimen/activity_horizontal_margin"
   android:paddingTop="@dimen/activity_vertical_margin"
   android:paddingBottom="@dimen/activity_vertical_margin" tools:context=".MainActivity">
   
   <TextView
      android:layout_width="wrap_content"
      android:layout_height="wrap_content"
      android:text="UI Animator Viewer"
      android:id="@+id/textView"
      android:textSize="25sp"
      android:layout_centerHorizontal="true" />
      
   <TextView
      android:layout_width="wrap_content"
      android:layout_height="wrap_content"
      android:text="Tutorials point"
      android:id="@+id/textView2"
      android:layout_below="@+id/textView"
      android:layout_alignRight="@+id/textView"
      android:layout_alignEnd="@+id/textView"
      android:textColor="#ff36ff15"
      android:textIsSelectable="false"
      android:textSize="35dp" />
      
   <ImageView
      android:layout_width="wrap_content"
      android:layout_height="wrap_content"
      android:id="@+id/imageView"
      android:src="@drawable/abc"
      android:layout_below="@+id/textView2"
      android:layout_centerHorizontal="true" />
      
   <Button
      android:layout_width="wrap_content"
      android:layout_height="wrap_content"
      android:text="Button"
      android:id="@+id/button"
      android:layout_marginTop="98dp"
      android:layout_below="@+id/imageView"
      android:layout_centerHorizontal="true" />

</RelativeLayout>
Here is the content of view.xml.
<?xml version="1.0" encoding="utf-8"?>
<RelativeLayout xmlns:android="http://schemas.android.com/apk/res/android"
   android:orientation="vertical" android:layout_width="match_parent"
   android:layout_height="match_parent">

   <Button
      android:layout_width="wrap_content"
      android:layout_height="wrap_content"
      android:text=" Button"
      android:id="@+id/button2"
      android:layout_gravity="center_horizontal"
      android:layout_centerVertical="true"
      android:layout_centerHorizontal="true" />
</RelativeLayout>
Here is the content of Strings.xml.
<resources>
   <string name="app_name">My Application</string>
</resources>
Here is the content of AndroidManifest.xml.
<?xml version="1.0" encoding="utf-8"?>
<manifest xmlns:android="http://schemas.android.com/apk/res/android"
   package="com.tutorialspoint.myapplication" >
   
   <application
      android:allowBackup="true"
      android:icon="@mipmap/ic_launcher"
      android:label="@string/app_name"
      android:theme="@style/AppTheme" >
      
      <activity
         android:name=".MainActivity"
         android:label="@string/app_name" >
         
         <intent-filter>
            <action android:name="android.intent.action.MAIN" />
            <category android:name="android.intent.category.LAUNCHER" />
         </intent-filter>
         
      </activity>
      
      <activity android:name=".second"></activity>
      
   </application>
</manifest>
Let's try to run your UI Testing application. I assume you have connected your actual Android Mobile device with your computer. To run the app from Android studio, open one of your project's activity files and click Run Eclipse Run Icon icon from the tool bar. Before starting your application, Android studio will display following window to select an option where you want to run your Android application.
Anroid UI Testing Tutorial
Select your mobile device as an option and then check your mobile device which will display application screen. Now just follow the steps mentioned at the top under the ui automator viewer section in order to perform ui testing on this application.