

The information that an application can access includes connected network's link speed,IP address, negotiation state, other networks information. Applications can also scan, add, save, terminate and initiate Wi-Fi connections.
Android provides WifiManager API to manage all aspects of WIFI connectivity. We can instantiate this class by calling getSystemService method. Its syntax is given below −
WifiManager mainWifiObj;
mainWifiObj = (WifiManager) getSystemService(Context.WIFI_SERVICE);
In order to scan a list of wireless networks, you also need to register your BroadcastReceiver. It can be registered using registerReceiver method with argument of your receiver class object. Its syntax is given below −
class WifiScanReceiver extends BroadcastReceiver {
   public void onReceive(Context c, Intent intent) {
   }
}

WifiScanReceiver wifiReciever = new WifiScanReceiver();
registerReceiver(wifiReciever, new IntentFilter(WifiManager.SCAN_RESULTS_AVAILABLE_ACTION));
The wifi scan can be start by calling the startScan method of the WifiManager class. This method returns a list of ScanResult objects. You can access any object by calling the get method of list. Its syntax is given below −
List<ScanResult> wifiScanList = mainWifiObj.getScanResults();
String data = wifiScanList.get(0).toString();
Apart from just Scanning, you can have more control over your WIFI by using the methods defined in WifiManager class. They are listed as follows −
| Sr.No | Method & Description |
|---|---|
| 1 |
addNetwork(WifiConfiguration config) This method add a new network description to the set of configured networks. |
| 2 |
createWifiLock(String tag) This method creates a new WifiLock. |
| 3 |
disconnect() This method disassociate from the currently active access point. |
| 4 |
enableNetwork(int netId, boolean disableOthers) This method allow a previously configured network to be associated with. |
| 5 |
getWifiState() This method gets the Wi-Fi enabled state |
| 6 |
isWifiEnabled() This method return whether Wi-Fi is enabled or disabled. |
| 7 |
setWifiEnabled(boolean enabled) This method enable or disable Wi-Fi. |
| 8 |
updateNetwork(WifiConfiguration config) This method update the network description of an existing configured network. |
Example
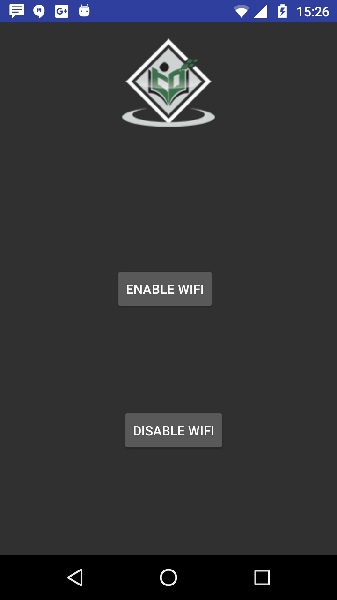
Here is an example demonstrating the use of WIFI. It creates a basic application that open your wifi and close your wifiTo experiment with this example, you need to run this on an actual device on which wifi is turned on.
| Steps | Description |
|---|---|
| 1 | You will use Android studio to create an Android application under a package com.example.sairamkrishna.myapplication. |
| 2 | Modify src/MainActivity.java file to add WebView code. |
| 3 | Modify the res/layout/activity_main to add respective XML components |
| 4 | Modify the AndroidManifest.xml to add the necessary permissions |
| 5 | Run the application and choose a running android device and install the application on it and verify the results. |
package com.example.sairamkrishna.myapplication;

import android.net.wifi.WifiManager;
import android.os.Bundle;
import android.app.Activity;
import android.content.Context;
import android.view.View;
import android.view.View.OnClickListener;
import android.widget.Button;

public class MainActivity extends Activity {
   Button enableButton,disableButton;
   @Override
   protected void onCreate(Bundle savedInstanceState) {
      super.onCreate(savedInstanceState);
      setContentView(R.layout.activity_main);

      enableButton=(Button)findViewById(R.id.button1);
      disableButton=(Button)findViewById(R.id.button2);

      enableButton.setOnClickListener(new OnClickListener(){
         public void onClick(View v){
            WifiManager wifi = (WifiManager) getSystemService(Context.WIFI_SERVICE);
            wifi.setWifiEnabled(true);
         }
      });

      disableButton.setOnClickListener(new OnClickListener(){
         public void onClick(View v){
            WifiManager wifi = (WifiManager) getSystemService(Context.WIFI_SERVICE);
            wifi.setWifiEnabled(false);
         }
      });
   }
}
Following is the modified content of the xml res/layout/activity_main.xml.
<?xml version="1.0" encoding="utf-8"?>
<RelativeLayout xmlns:android="http://schemas.android.com/apk/res/android"
   xmlns:tools="http://schemas.android.com/tools" android:layout_width="match_parent"
   android:layout_height="match_parent"
   android:paddingLeft="@dimen/activity_horizontal_margin"
   android:paddingRight="@dimen/activity_horizontal_margin"
   android:paddingTop="@dimen/activity_vertical_margin"
   android:paddingBottom="@dimen/activity_vertical_margin" tools:context=".MainActivity">

   <ImageView
      android:layout_width="wrap_content"
      android:layout_height="wrap_content"
      android:id="@+id/imageView"
      android:src="@drawable/abc"
      android:layout_alignParentTop="true"
      android:layout_centerHorizontal="true" />

   <Button
      android:id="@+id/button1"
      android:layout_width="wrap_content"
      android:layout_height="wrap_content"
      android:layout_marginLeft="76dp"
      android:text="Enable Wifi"
      android:layout_centerVertical="true"
      android:layout_alignEnd="@+id/imageView" />

   <Button
      android:id="@+id/button2"
      android:layout_width="wrap_content"
      android:layout_height="wrap_content"
      android:text="Disable Wifi"
      android:layout_marginBottom="93dp"
      android:layout_alignParentBottom="true"
      android:layout_alignStart="@+id/imageView" />

</RelativeLayout>
Following is the content of AndroidManifest.xml file.
<?xml version="1.0" encoding="utf-8"?>
<manifest xmlns:android="http://schemas.android.com/apk/res/android"
   package="com.example.sairamkrishna.myapplication" >
   <uses-permission android:name="android.permission.ACCESS_WIFI_STATE" />
   <uses-permission android:name="android.permission.CHANGE_WIFI_STATE" />

   <application
      android:allowBackup="true"
      android:icon="@mipmap/ic_launcher"
      android:label="@string/app_name"
      android:theme="@style/AppTheme" >

      <activity
         android:name=".MainActivity"
         android:label="@string/app_name" >

         <intent-filter>
            <action android:name="android.intent.action.MAIN" />
            <category android:name="android.intent.category.LAUNCHER" />
         </intent-filter>

      </activity>

   </application>
</manifest>
Let's try to run your application. I assume you have connected your actual Android Mobile device with your computer. To run the app from Android studio, open one of your project's activity files and click Run
 icon from the toolbar. Before starting your application, Android studio
will display following window to select an option where you want to run
your Android application.
icon from the toolbar. Before starting your application, Android studio
will display following window to select an option where you want to run
your Android application.
Tidak ada komentar:
Posting Komentar