
This plugin is used for taking photos or using files from the image gallery.
Step 1 - Install Camera Plugin
Run the following code in the command prompt window to install this plugin.
C:\Users\username\Desktop\CordovaProject>cordova plugin add cordova-plugincamera
Step 2 - Adding Button and Image
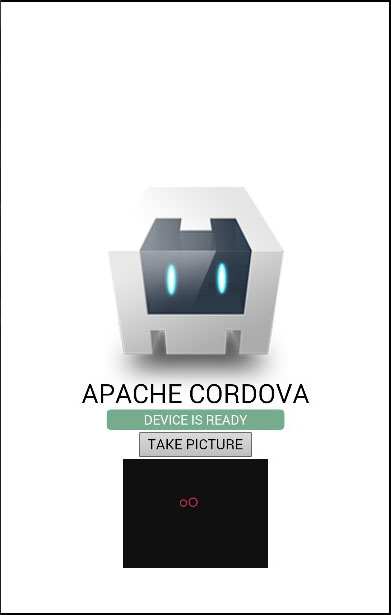
Now, we will create the button for calling the camera and img where the image will be displayed once taken. This will be added to index.html inside the div class = "app" element.
<button id = "cameraTakePicture">TAKE PICTURE</button>
<img id = "myImage"></img>
Step 3 - Adding Event Listener
The event listener is added inside the onDeviceReady function to ensure that Cordova is loaded before we start using it.
document.getElementById("cameraTakePicture").addEventListener
   ("click", cameraTakePicture);
Step 4 - Adding Functions (taking photo)
We will create the cameraTakePicture function that is passed as a callback to our event listener. It will be fired when the button is tapped. Inside this function, we will call the navigator.camera global object provided by the plugin API. If taking picture is successful, the data will be sent to the onSuccess callback function, if not, the alert with error message will be shown. We will place this code at the bottom of index.js.
function cameraTakePicture() {
   navigator.camera.getPicture(onSuccess, onFail, {
      quality: 50,
      destinationType: Camera.DestinationType.DATA_URL
   });

   function onSuccess(imageData) {
      var image = document.getElementById('myImage');
      image.src = "data:image/jpeg;base64," + imageData;
   }

   function onFail(message) {
      alert('Failed because: ' + message);
   }
}
When we run the app and press the button, native camera will be triggered.
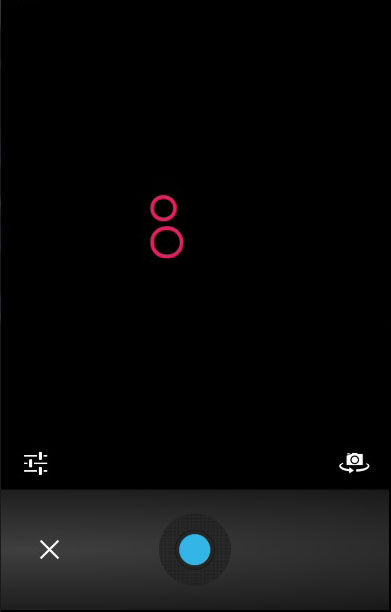
When we take and save picture, it will be displayed on screen.
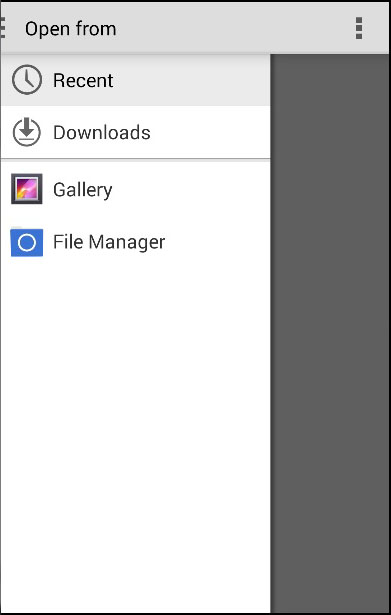
The same procedure can be used for getting image from the local file system. The only difference is the function created in the last step. You can see that the sourceType optional parameter has been added.
Step 1 B
C:\Users\username\Desktop\CordovaProject>cordova plugin add cordova-plugincamera
Step 2 B
<button id = "cameraGetPicture">GET PICTURE</button>
Step 3 B
document.getElementById("cameraGetPicture").addEventListener("click", cameraGetPicture);
Step 4 B
function cameraGetPicture() {
   navigator.camera.getPicture(onSuccess, onFail, { quality: 50,
      destinationType: Camera.DestinationType.DATA_URL,
      sourceType: Camera.PictureSourceType.PHOTOLIBRARY
   });

   function onSuccess(imageURL) {
      var image = document.getElementById('myImage');
      image.src = imageURL;
   }

   function onFail(message) {
      alert('Failed because: ' + message);
   }

}
When we press the second button, the file system will open instead of the camera so we can choose the image that is to be displayed.
This plugin offers lots of optional parameters for customization.
| S.No | Parameter & Details |
|---|---|
| 1 |
quality
Quality of the image in the range of 0-100. Default is 50.
|
| 2 |
destinationType
DATA_URL or 0 Returns base64 encoded string.
FILE_URI or 1 Returns image file URI.
NATIVE_URI or 2 Returns image native URI.
|
| 3 |
sourceType
PHOTOLIBRARY or 0 Opens photo library.
CAMERA or 1 Opens native camera.
SAVEDPHOTOALBUM or 2 Opens saved photo album.
|
| 4 |
allowEdit
Allows image editing.
|
| 5 |
encodingType
JPEG or 0 Returns JPEG encoded image.
PNG or 1 Returns PNG encoded image.
|
| 6 |
targetWidth
Image scaling width in pixels.
|
| 7 |
targetHeight
Image scaling height in pixels.
|
| 8 |
mediaType
PICTURE or 0 Allows only picture selection.
VIDEO or 1 Allows only video selection.
ALLMEDIA or 2 Allows all media type selection.
|
| 9 |
correctOrientation
Used for correcting orientation of the image.
|
| 10 |
saveToPhotoAlbum
Used to save the image to the photo album.
|
| 11 |
popoverOptions
Used for setting popover location on IOS.
|
| 12 |
cameraDirection
FRONT or 0 Front camera.
BACK or 1 Back camera.
ALLMEDIA
|
Tidak ada komentar:
Posting Komentar